Tuesday, August 9, 2011

HETMAN !


Another experiment with ethnic style. Large and heavy but very easy to knit – this is a vest for Yura, husband of my cousin Anichka (Kostik's father). He is a philologist and an expert in Ukrainian language, culture and history.

Materials:

9 balls of Elann Peruvian Highland Chunky (100% wool), color – Light Grey Heather, each ball 50 g /1.75 ounces – 70 yards;

5 balls of the same Peruvian Highland Chunky, color – Mid Indigo;

2 balls of Peruvian Hingland Chunky, color – Charcoal Heather.

1 ball Lion Brand Microspoon (micro-fiber acrylic 100%), 2.50 oz./70 g - 168 yd/154 m, color – black; for Kitchener cords;

Needles # 10 / 6 mm (or size to obtain gauge);

Smaller needles # 4 / 3.5 mm;

Sewing needle; Crochet hook # 3.

Gauge - 13 stitches in 10 cm/4” worked on garter stitch with needles # 10.

Size – L-XL.

As Yura’s appearance speaks for itself, I wanted this vest to be very simple, with little picturesque details: the front of is made with angle knitting (2 pieces), the back is absolutely ordinary 1 piece, and only garter stitch is used all over the vest. The front is decorated with sewn on cords made of black Microspoon yarn. Simple frog closures.


Note about selvage stitches (ss): Always slip the first stitch in the beginning of each row and purl the last stitch in the end of each row. In such a way you will have a chain of selvage stitches, - one vertical loop for each 2 rows - on each side of a knitted piece. I usually don’t count rows, I count selvage stitches. Another advantage – they look very nice when assembled by mattress stitch.

LEFT FRONT

With Charcoal Heather yarn cast on 124 sts (40 sts – horizontal side, 1 central stitch (mark it with color yarn, on both sides of this stitch we will decrease stitches in every right side row; that will create an angle), and 83 sts of vertical side).

1st row (right side): 1ss (selvage stitch), 37 k., 2k together, 1 k. (central st), 2k together, 80 k., 1 ss.

2nd row (wrong side): 1 ss, 38 k., 1 p. (central stitch), 81 p., 1 ss.

Change color to Indigo and knit 8 more rows decreasing 1 stitch on both sides of the marked central stitch (like in the row 1).

Change color to Charcoal Heather (2 rows will be knitted). Beginning with this row, we start to shape the neckline. Add in the beginning of the next wrong row 1 stitch.

Change color to Indigo and knit 8 more rows. At the same time add 1 stitch in the beginning of 4, 6 and 8 Indigo rows.

Change color to Charcoal Heather and knit 2 rows, casting on in the beginning of the wrong side row 2 stitches.

Change color to Light Grey Heather and cast on 2 stitches in the beginning of 2nd and 3 stitches in the beginning of the 4th Light Grey Heather row. End of neckline shaping.

Continue with Light Grey Heather only, work 6” (15 cm) after the neckline shaping and start armhole shaping: in the beginning of the wrong side row cast off 30 stitches. Then in the beginning of the next wrong rows cast off 2 sts 2 times, 1 st 2 times, work 2 rows straight and bind off.

Make the right half symmetrical to the left one.


BACK

Cast on 80 sts with Charcoal Heather color and work straight 55 ss (110 rows) as following: 1 row – Charcoal Heather, 8 rows Indigo, 2 rows – Charcoal Heather, 8 rows –Indigo, 2 rows – Charcoal Heather, and the rest - Light Grey yarn. Bind off in the beginning of every row 3 sts 1 time, 2 sts 1 time, 1 st 2 times for the armholes.

Work straight 28 ss (56 rows) and begin the back neckline shaping: Work 38 sts, bind off 20 sts and work 38 sts to the end of the row. Continue to work on both parts separately: in the end of the next row decrease 1 st, in the beginning of the next row bind off 5 sts, in the next row bind off all the rest. Work the opposite side symmetrically.


ASSEMBLING AND TRIMMING

Sew only shoulder seams.

Neckline trimming:

With Charcoal Heather cast on 90 sts around the neckline on the right side and work one row (wrong side).

Switch to Indigo color (10 rows): work 2 rows, change needles to the smaller size and work straight 6 more rows. In the next Indigo row work 4 k, 2 k together to the end of the row and work one more Indigo Row.

Switch color to Charcoal Heather and work 2 row straight, then in the third row work *2 k together, 1 yo (yarn over needle)* to the end of the row to obtain a row of holes. Work one more row.

Switch color to Indigo. Work 2 rows. In the third row repeat *4 k, make one* to the end of the row. Work 5 more rows straight. Change needles to the larger size and work 4 more rows straight. Bind off, fold to the wrong side and sew on.

Cords.

For one frog closure make 2 Kitchener cords using black Microspoon yarn and smaller size needles: one 130, another - 110 rows long. Make a node in the middle of the longer one (see the picture).

With cotton color tread mark where 3-5 frog closures will be sewn on (I made just 3). Pin one cord at a time to the front of the vest using a stoarfoam board, baste with the same yarn that was used to make the cord, unpin and meticulously sew on in hands.


With cotton color thread mark a square on the bottom of the front. Inside the square mark the pattern. Make 4 pieces of Kitchener cord for each half-front and pin and sew them on one piece at a time – exactly like for the frog closure. Hide securely all the yarn tails in the cord tubes using a crochet hook.


It is better to sew on the cords right after the neckline is done and before assembling the whole vest.

Armhole trimming:

With Charcoal Heather cast on 90 sts around the armhole and work exactly the same trimming as for the neckline. Assemble side seams before folding and sewing the trims to the wrong side.

THE END.


Wednesday, July 6, 2011

FLOWERS


A sweater for Valery. He is a Chef cook, flower whisperer, and husband of my dear cousin Lidochka. Everyone who knows him loves him, everything he cooks is delicious and beautiful, everything he fixes works and runs, everything he plants grows fast and thrives :-)


More than 10 years ago I was impressed with an elegant Italian multicolored sweater with flower patterns, which looked however very masculine. Back then I decided to play one day with this idea, but did it only now.

Materials:

10 balls of Stroll Sport Yarn Sport from KnitPicks (75% superwash merino wool, 25% nylon) color – Baltic Heather, each ball 50 g /1.75 ounces – 137 yards.

5 balls of Felici Sport Self Striping yarn from KnitPicks (superwash merino wool, 25% nylon), color – Boutique, each ball 50 g /1.75 ounces – 164 yards.

Needles # 4 / 3.5 mm (or size to obtain gauge).

Smaller needles # 3 /3 mm (for ribbing).

Sewing needle.

Gauge - 22 stitches in 10 cm/4” worked on simple knit (fair isle).

Size – M-L


The body of the sweater is made of one front central panel and one back central panel (they differ only by neckline shape) worked in fair isle 1; 2 very long symmetrically knitted side panels with cables (no shoulder seams); and 2 identical small under-arm panels worked in faie isle 2.

The sleeves consist of 4 details each: a central panel worked in fair isle 1; 2 sleeve braids; and an under-arm sleeve panel worked in fair isle 2. Fair isle and cords have different vertical gauge that is why they are worked separately.

Fair Isle 1:                                                                              Fair Isle 2:


 Cable panel:


STITCH PATTERN cable panel:

Stitch Key


Stockinet Stitch: Knit 1 (k) on right side rows, purl 1 (p) on wrong side rows.

Reverse Stockinet Stitch: Purl 1 on right side rows, knit 1 on wrong side rows.

c6b: Slip next 3 stitches onto cable needle, hold at back of work. Knit 3, knit the stitches on the cable needle.

c6f: Slip next 3 stitches onto cable needle, hold at front of work. Knit 3, knit the stitches on the cable needle.

t2b: Slip next stitch onto cable needle, hold at back of work. Knit the next stitch, purl the stitch on the cable needle.

t2f: Slip next stitch onto cable needle, hold at front of work. Purl 1, knit the stitch on the cable needle.

c2b: Slip next stitch onto cable needle, hold at back of work. Knit the next stitch, knit the stitch from the cable needle.

c2f: Slip next stitch onto cable needle, hold at front of work. Knit 1, knit the stitch on the cable needle.


Row 1 (Right Side): k9, p1, k1, [p2, k2] 2 times, p2, k1, p1, k9.

Row 2 (Wrong Side): p9, k1, p1, [k2, p2] 2 times, k2, p1, k1, p9.

Row 3: k3, c6b, p1, k1, [p2, c2b] 2 times, p2, k1, p1, k3, c6b.

Row 4: p9, k1, p1, [k2, p2] 2 times, k2, p1, k1, p9.

Row 5: c6f, k3, p1, [t2f, t2b] 3 times, p1, c6f, k3.

Row 6: p9, [k2, p2] 3 times, k2, p9.

Row 7: k3, c6b, [p2, c2f] 3 times, p2, k3, c6b.

Row 8: p9, [k2, p2] 3 times, k2, p9.

Row 9: c6f, k3, p1, [t2b, t2f] 3 times, p1, c6f, k3.

Row 10: p9, k1, p1, [k2, p2] 2 times, k2, p1, k1, p9.

Repeat rows 3-10.


Note about selvage stitches (ss): Always slip the first stitch in the beginning of each row and purl the last stitch in the end of each row. In such a way you will have a chain of selvage stitches, - one vertical loop for each 2 rows - on each side of a knitted piece. I usually don’t count rows, I count selvage stitches. Another advantage – they look very nice when assembled by mattress stitch.


FRONT CENTRAL PANEL

Cast on 63 sts. and work straight 61 ss (122 rows), fair isle 1. Then shape the neckline: in the right side row work 18 sts, bind off 27 sts, and work 18 sts to the end of the row. Turn and work to the end of the wrong side row. Then bind off in the beginning of every right side row 3, 2, 1, 1, 1, 0 sts, and bind off the remaining 10 sts making sure that total length of the Front Central Panel = 67 ss (134 rows). In the same way finish the opposite side of piece.


BACK CENTRAL PANEL

Cast on 63 sts. And work straight 65 ss (130 rows), fair isle 1. Then in the right side row work 18 sts, bind off 27 sts, and work 18 sts to the end of the row. Turn and work to the end of the wrong side row. Then bind off in the beginning of the right side row 8 sts, and bind off the remaining 10 sts making sure that total length of the Front Central Panel = 67 ss (134 rows). In the same way finish the opposite side of piece.

LEFT SIDE PANEL

Cast on 34 sts. Initial row: 1 st – selvage stitch (ss), 9 sts – braid, 1p, 1k, 2p, 2k, 2p, 2k, 2p, 1k, 1p, 9 sts – braid, 1 ss.

Work 66 ss and mark both selvage stitches with safety pins. Then start working short rows so that outer edge of the panel remains the same 66 ss, but the inner edge is longer to match the center pieces. So, in the wrong side row work 23 sts, the 24th will be our turning point. Take yarn to the wrong side of the fabric and slip the turning point stitch from left to right needle; take yarn to the front side of the fabric and turn work. The yarn is wrapped around the turning point. Always slip the turning point stitch in the right side row from left to right needle. It was the first short row. Make 4 more wrong side short rows. Mark the last selvage stitch on the inner side of the panel with a safety pin.

Continue to work straight – 66 more ss, bind off.

The Right Side panel is worked as mirrored left side panel: work a piece 66 ss long, then in the right side row work 23 sts, the 24th will be our turning point. Take yarn to the wrong side of the fabric and slip the turning point stitch from left to right needle; take yarn to the front side of the fabric and turn work. The yarn is wrapped around the turning point. Always slip the turning point stitch in the right side row from left to right needle. It was the first short row. Make 4 more wrong side short rows. Mark the last selvage stitch on the inner side of the panel with a safety pin.
Continue to work straight – 66 more ss, bind off.


UNDER-ARM PANEL

Cast on 24 sts and work with fair isle 2 38 ss (76 rows). In the right side row work 7 sts, bind off the middle 10 sts and work 7 sts. In the beginning of each right side row bind off 3, 2, 1, and 1 sts. Bind off. In the same way finish the opposite side of piece.


SLEEVE CENTRAL PANEL

Cast on 63 sts and work with fair isle 1 50 ss (100 rows). . In the beginning of each row bind off 3, 3, 3, 4, and 5 sts. Bind off.


SLEEVE CABLE (4 pieces)

Cast on 11 sts and work 60 ss (120 rows). In the beginning of each right side row and in the end of each wrong side row decrease 1 stitch (10 rows = 10 sts). Bind off 1 remaining sts. Make one more piece.

Cast on 11 sts and work 60 ss (120 rows). In the end of each right side row and in the beginning of each wrong side row decrease 1 stitch (10 rows = 10 sts). Bind off 1 remaining sts. Make one more piece.

SLEEVE UNDER-ARM PANEL

Cast of 3 sts. Start with colored yarn only. In the third row increase 1 stitch both sides of the piece, and then increase 1 sts both sides of the piece in every 4th row until the piece is 41 sts wide (add blue yarn starting approximately with 9th row and work fair isle 2). Work even until the piece is 42 ss (84 rows) long.

In the right side row work 14 sts, bind off the middle 13 sts and work 14 sts to the end of the row. In the beginning of each right side row bind off 4, 3, 3, 2, 2, 1, 1, 1 sts. Bind off. In the same way finish the opposite side of piece.


ASSEMBLY:

When fair isle panels are finished, spread them and lightly iron them through a wet cotton cloth, without pressing. Let them rest until totally dry.

Using mattress stitching, make short shoulder seams, attaching Front Central Panel to the Back Central Panel.

Attach side panels to the center panels starting from the bottom. Sew loosely, making these seams as stretchy as possible and checking the seam often making sure that they are as stretchy as the knitted material. Then attach the Under-arm Panels with the same type of seam. Mark the 48th selvage stitch from the bottom on the side panels (4 marks), this is where the top points of the under-arm side panels will be attached. The gauge of fair isle and cable panels is different, so the number of selvage stitches of the Center Panels and Side Panels, which are being sewn together, will not be equal. But it is important to know where exactly the under-arm side panels end, and this is exactly the 48th ss on the cable panels. First, attach the left panel to the Front Center Panel, then attach the right panel to the Back Center Panel. Also make the seams very stretchy.


Assemble the sleeves in the same way leaving one seam open (between a Sleeve Under-arm Panel and a braid).


RIBBING (the body and the sleeves): use smaller size needles.

Cast 108 sts on the assembled back and under-arm panel Work on 1x1 rib 22 rows and bind off leaving a long thread for assembling. Cast on 108 sts on the assembled front + under-arm panel. Work on 1x1 rib 22 rows and bind off leaving a long thread for assembling. Cast on 44 sts on the sleeve bottom and work 1x1 rib stitch, work 22 rows and bind off leaving a long thread for assembling.

Finish the side and sleeve seems starting from the bottom.


COLLAR

Cast on 108 sts on the neck line and work 1x1 rib stitch 4 rows. Using smaller size needles continue work 14 rows, and the last 4 rows work with larger needles. Fold the collar to the right side, pin and sew the stitches on (Kitchener seam).

Mark the top of the armhole and the top of the sleeve (1/2) with colorful yarn or stitch markers. Start sewing a sleeve into an armhole from the very bottom. When finished attaching the sleeve to the under-arm panel, begin to sew the sleeve deeper and deeper under the braid (not to its immediate edge). The top part of the sleeve should be attached to the inner edge of the braid and slightly eased in. The seam curve should be smooth (see Picture), and the free edge of the cable should rest loosely on the sleeve. The top marks should match.

Wrong side:                                                                                             On me:
                
                                                               With Lidochka:

Tuesday, April 12, 2011

ROYAL SWEATER


Another sweater for another very good friend from Odessa, Ukraine J.  What amazes me about Nickolas: he makes me wonder if the soviet times really ever happened to us or it was just a bad dream. Nickolas looks and behaves as if he grew up in different times or in a different country. His gentle attitude and regal self-composure inspired me to knit something “time-and-place-defying” for him. Yes, I used huge opulent Costume Encyclopedias J . And I have a feeling that this sweater rhymes somehow not only with his appearance and personality, but also with his beautiful family, countless pets, and network engineering…


Materials:

21 balls of KnitPicks Merino Style yarn (100% merino wool), each ball 50 g /1.75 ounces – 123 m/112 yards.
Needles #6/4 mm (or size to obtain gauge).
Sewing needle.
Gauge - 17 stitches in 10 cm/4” worked on simple knit (although simple knit is nowhere used here).

Size – M-L


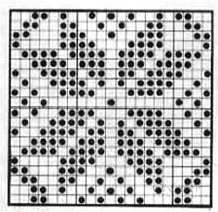
Although it looks complicated, this is the easiest and the most classical sweater I’ve made so far. It has one-piece front, one-piece back, 2 sleeves, collar… and nothing more. Nothing is detachable or assembled from several panels or patches. Each detail is worked bottom-up, starting with ribbing. The main Royal Diamond stitch (see diagram) just looks complicated but actually doesn’t have anything to do with cables. I have to give credit to Natasha from Siberia who showed to me this beautiful reversible stitch (I feel I will use more than once in my life). For this sweater I used right side of it for the Front and Back and the wrong side – for the sleeves. Hard to believe, but it is the same stitch.

Enough simple Cable Stitch pattern V-frames the front center triangle of Crossed Ribbing. The Back and the sleeves are made completely out of Royal Diamond stitch. Arm seams where the sleeves are attached to the body are adorned with simple sewed-on cables 3x3.


Royal Diamond Stitch Pattern

RunThreadInc: Pick up the running thread that lies before the next stitch and knit it. It is not supposed to be a hole here like in open-work patterns!

RunThreadIncPurl: Pick up the running thread that lies before the next stitch and purl it. No hole!

k2tog: Knit 2 stitches together.

VertDblDec (knit 3 together, balanced): Slip next 2 stitches together knitwise, knit next stitch. Pass the 2 slipped stitches over knit stitch.

p3tog: Purl the next 3 stitches together.

p2tog: Purl the next 2 stitches together.

For a swatch cast on (12 x N + 13) sts (i. e. 25, or 37, or 49, …..sts).
Rows 1 - 14 :

Row 1 (Right Side): k3, p3, *p4, k5, p3*, p4, k3.
Row 2 (and all even numbered rows): as established.

Row 3: k1, RunThreadInc, k2, p2, * p3tog, p2, k2, RunThreadInc, k1, RunThreadInc, k2, p2*, p3tog, p2, k2, RunThreadInc, k1.

Row 5: k2, RunThreadInc, k2, p1, *p3tog, p1, k2, RunThreadInc, k3, RunThreadInc, k2, p1*, p3tog, p1, k2, RunThreadInc, k2.

Row 7: p3, RunThreadIncPurl, k2, *VertDblDec, k2, RunThreadIncPurl, p5, RunThreadIncPurl, k2*, VertDblDec, k2, RunThreadIncPurl, p3.

Row 9: p2tog, p2, k2, RunThreadInc, *k1, RunThreadInc, k2, p2, p3tog, p2, k2, RunThreadInc*, k1, RunThreadInc, k2, p2, p2tog.

Row 11: p2tog, p1, k2, RunThreadInc, k1, *k2, RunThreadInc, k2, p1, p3tog, p1, 2k, RunThreadInc, k1*, k2, RunThreadInc, k2, p1, p2tog.

Row 13: k2tog, k2, RunThreadIncPurl, p2, *p3, RunThreadIncPurl, k2, VertDblDec, k2, RunThreadIncPurl, p2*, p3, RunThreadIncPurl, k2, k2tog.

Row 14: as established.

Repeat rows 3-14.


Right Side


Wrong Side


Crossed ribbing


Stitch Key

c2b: Slip next stitch onto cable needle, hold at back of work. Knit the next stitch, knit the stitch from the cable needle.

c2f: Slip next stitch onto cable needle, hold at front of work. Knit 1, knit the stitch on the cable needle.


Row 1 (Right Side): k2, p2.

Row 2 (Wrong Side): as established

Row 3: c2f, p2.

Row 4: as established.

Row 5: c2b, p2.

Row 6: as established.

Repeat rows 3-6.


Cable Stitch


20 stitches x 44 rows

Stitch Key

c6b: Slip next 3 stitches onto cable needle, hold at back of work. Knit 3, knit the stitches on the cable needle.

c6f: Slip next 3 stitches onto cable needle, hold at front of work. Knit 3, knit the stitches on the cable needle.

c2b: Slip next stitch onto cable needle, hold at back of work. Knit the next stitch, knit the stitch from the cable needle.

c2f: Slip next stitch onto cable needle, hold at front of work. Knit 1, knit the stitch on the cable needle.

Rows 1 - 44


Row 1 (Right Side): k2, p2, k2, p2, k12.

Row 2 and all even numbered rows: (Wrong Side): as established

Row 3: c2f, p2, c2f, p2, c6b, c6f.
Row 5: c2b, p2, c2b, p2, k12.
Row 7: c2f, p2, c2f, p2, k12.
Row 9: c2b, p2, c2b, p2, c6b, c6f.
Row 11: c2f, p2, c2f, p2, k12.
Row 13: c2b, p2, c2b, p2, k12.
Row 15: c2f, p2, c2f, p2, c6b, c6f.
Row 17: c2b, p2, c2b, p2, k12.
Row 19: c2f, p2, c2f, p2, k12.
Row 21: k6, p2, c6b, c6f.
Row 23: k6, p2, k3, [p1, k1] 2 times, p1, k4.
Row 25: k6, p2, k3, [p1, k1] 2 times, p1, k4.
Row 27: c6b, p2, k4, [p1, k1] 2 times, p1, k3.
Row 29: k6, p2, k3, [p1, k1] 2 times, p1, k4.
Row 31: k6, p2, k4, [p1, k1] 2 times, p1, k3.
Row 33: c6b, p2, c6f, c6b.
Row 35: k6, p2, k12.
Row 37: k6, p2, k12.
Row 39: c6b, p2, c6f, c6b.
Row 41: k6, p2, k12.
Row 43: k6, p2, k12.
Row 44: as established.

Repeat rows 15-44, but continuing 3x3 side cable as established (instead of crossed ribbing).

I would recommend starting with the Back to get used to the Royal Diamond stitch and all its peculiarities. The shape of the Back is very simple and provides good practice with the stitch pattern. In this way, when you start the Front where Royal Diamond is combined with Cables and Crossed Ribbing, this stitch will be well familiar and all the increases and decreases associated with center ribbing inset will be done routinely without difficulties.

Note about selvage stitches (ss): Always slip the first stitch in the beginning of each row and purl the last stitch in the end of each row. In such a way you will have a chain of selvage stitches, - one vertical loop for each 2 rows - on each side of a knitted piece.

BACK:


Cast on 108 sts and work 19 rows of Crossed Ribbing. In 20th row (wrong side, all purls) evenly add 39 sts (147 sts total). Work straight 38 ss (76 rows) with Royal Diamond Stitch and try not to be bored.

For the armholes cast off 12 sts from both sides (123 sts left).

Work straight 34 ss (68rows). To shape the neckline: in the right row work 46 sts, cast off the middle 31 sts and work to the end of the row. In the next wrong side row purl together 2 last sts, in the next right row knit together first 2 sts, cast off all the sts in the right side row. In the same way finish the opposite side of the piece.


FRONT:


The description will look a little complicated but I’m posting a large clickable photo of the front to make the work more clear.

Cast on 111 sts. = 1 ss + 34 sts of Crossed ribbing + 20 sts of Cable stitch + 1p + 20 sts of mirrored Cable stitch + 34 sts of Crossed ribbing + 1 ss.

Row 1 (right side): 1 ss, (2p, 2k) 8 times, 2p, place a stitch marker, Cable stitch (20 sts), 1 p, mirrored cable stitch (20 sts), place a stitch maker, 2p, (2k, 2p) 8 times, 1ss.

Row 2 (wrong side) and all evenly numbered rows rows exept 20th : work as established.

Work 19 rows of Crossed ribbing and Cable Stitch. In 20th (wrong side) row purl all the 34 sts of Crossed stitch at the same increasing each side evenly by 19 sts (make 1, purl 2, make 1, purl 2 until each side is equal 34+19=53) (Total= 111+19+19=149 sts). Work Cable Stitches in the middle without changes.

Row 21. Work as follow: 1 ss, 51 sts of Royal Diamond Stitch instead of Crossed Rib, 2 p, stitch marker, Cable stitch (20 sts), 1 p – center stitch, mirrored cable stitch (20 sts), 2p, 51 sts of Royal Diamond Stitch instead of Crossed Rib (make the left side mirrored to the right side), 1 ss.

Row 23. In this row the cables start to divert from the center to form a V. From both sides of 1 p – center stitch we will make 1 sts, and to compensate this we will purl 2 together right before the first stitch marker and right after the second one. Starting with this row, in every other right side row (27, 31, 35 etc.) we will purl 2 together right before the first stitch marker, make one immediately after Cable stitch pattern and before the mirrored Cable stitch pattern, and purl 2 together just after the second stitch marker. The center sts are worked in Crossed ribbing pattern. Continue this way until there are just 15 sts left on each side for the Royal Diamond Pattern, then work the cables straight.

Like on the Back, bind off for the armholes 12 sts from both sides (Total=149-12-12=125 sts). Work 28 ss (56 rows) straight.

To shape the neckline: in the right row work 56 sts, cast off the middle 13 sts and work to the end of the row 56 sts. In the next wrong side row purl together 2 last sts. In the next right side row bind off first 2 sts and work to the end of the row. Decrease in the beginning of every right side row 2, 1 and 1 sts, and then work straight until the FRONT reaches the length of the BACK (approximately 36 ss (72 rows) after armhole shaping). Then cast off all the sts. In the same way finish the opposite side of the piece.

COLLAR:


After completing the shoulder seams with mattress stitch, cast on 102 sts on the neck line and work Crossed Rib stitch 25 cm or 10” long, bind off very loosely. The collar can be made separately and then sewn on the neckline – will save lots of time and energy. Sew the 10” collar seam with inside-out mattress stitch; the seam is not to be visible but the right side of Crossed Rib has to be visible when the collar is folded to the right side, so don’t mix up the wrong and right side of the collar when assembling.


SLEEVE:


Cast on 50 sts and work 19 rows with Crossed Ribbing. In 20th row (wrong side, all knits) evenly add 25 sts (75 sts total). Work 60 ss (120 rows) with Royal Diamond Stitch wrong side out: 4 rows – straight, then increasing 1 stitch each side on every 2nd row 18 times, then 1 stitch each side on every row to obtain 111 sts on the needle. While increasing, include your added stitches into “diamonds”.

Then decrease in the beginning on every row: 1 st 1 time, 2 sts 1 time, 3 sts 1 time, 4 sts 1 time, 5 sts 1 time, 6 sts 1 time and 7 sts 1 time. Bind them off the remaining sts.

Note: when making sleeves where the wrong side serves as the right one, I would introduce a little change in Royal Diamond Stitch Pattern: every time you purl 3 together, do it in such a way that on the other side it looks like a balanced Vertical Double Decrease. I provide the photo where the columns of vertical double decreases are clearly visible on the sleeves, but not the description how to do this. We all purl in different ways, and I’m afraid I will confuse some of the knitters who work their purls not like me. That is why I suggest to experiment on your own and find the easy way to purl 3 together getting on the other side a symmetrical stitch.

To cover the sleeve seams, make separately 2 strips of 3x3 cable. Cast on 10sts (1 ss, 1p, 6 k for the cable, 1p, 1 ss) and work 80 ss (160 rows).


ASSEMBLING:

1) Attach the sleeves (flat);

2) Pin the cable strips on top of the armhole seams and sew them on loosely;

3) Make the side seams and sleeve seams.

4) Sew together the short sides of the sleeve cable strips and hide loose ends of threads under this cable like in a pipe.


5) Finish the bottom ends of 2 front cables to make them look like pointing down arrows.

                                   END


Some more photos:

Friendly hug


On me, as usual...

Nickolas loves to sail, and he was wearing a nautical top underneath the Royal Sweater during the photo shooting