Friday, November 26, 2010

Jack Deloney's sweater

"...чтобы были ваши кисти, словно листья,
словно листья, словно листья к ноябрю."

To make a sweater for our family’s old friend and the South’s leading watercolor artist
 Jack Deloney I started with Bulat Okudzhava’s poem "Как научиться рисовать" (“Learning to paint”). Here is the link to the video with Okudzhava reading the poem himself:


Here it is translated into English by a Russian poet and translator A. Vagapov:

If you would like to become a great artist
don’t rush to paint, make it best.
All sorts of paints, badges brushes lay out
right in front of you, first;

now you should start choosing paints; take the white one
it’s the beginning, and then
pick up the yellow paint, it will imply that
everything ripens, and then

pick up the gray paint in order that autumn
might splash the sky pattern with lead,
pick up the black paint because as is known
all has beginning and end,

pick up the violet paint, do not spare it,
laugh and shed tears, and then
pick up the blue paint in order that evening
might nestle down on your palm,

pick up the red paint in order that fire
might flicker and, shimmer and then
pick up the green paint in order that you might
have twigs to throw into flame.

Mix up these paints like you mix up emotions
deep in your heart, after that
mix up the paints and your heart with both heaven
and earth, all in one, after that...

It is important that you burn without
Being disturbed and upset.
Someone may censure you in the beginning
but afterwards will not forget!

I simply put together the threads of thin and delicate yarns of all eight colors mentioned in the poem, sat thoughtful and quiet for a little bit, and came up with the following idea.


The body of this sleeveless sweater is made of 2 center panels (the front one is long, the back one is short), 2 side panels, and a long bottom panel.

Everything except ribbing and bottom panel is made with the same basic stitch:

1 r.(wrong side) all purls

2r. (right side) 1 k., 1 slip the stitch from the left to the right needle.

For the front and back panels the right side of this stitch is used, for the sides – the wrong side.

For the bottom panel an easy cable pattern is used.

2-colored corded trims are used: violet/yellow, violet/green, violet/blue, and violet/red. Like in the poem: be generous with violet…. For the corded trims 8 strands of yarn of each color are used, so make 4 little solid colored balls (violet, yellow, blue, green, and red).

Materials:

Yarns:

Elann Baby Lace Merino (50% baby alpaca, 50% merino wool), lace weight: 1.75 oz (50 grams) = 60 yards (550 m) or the following colors:

Yellow – 2 balls, grey – 2 balls, black – 2 balls, lilac – 3 balls, blue – 2 balls, red – 2 balls, green – 2 balls;

White color - Kartopu (Turkish yarn, 25% tiftik… God knows what this is… and 75% acrylic): 2.5 oz (100 g) = 525 m – 1.5 balls.


Needles:

1) larger needles - number 8 (5mm) or to obtain gauge – 18 sts in 4” (10 cm) worked in the basic stitch.

2) smaller number circular needles: number 3 (3mm).

4 wooden buttons about 1” -1 1/8” (25-28 mm)

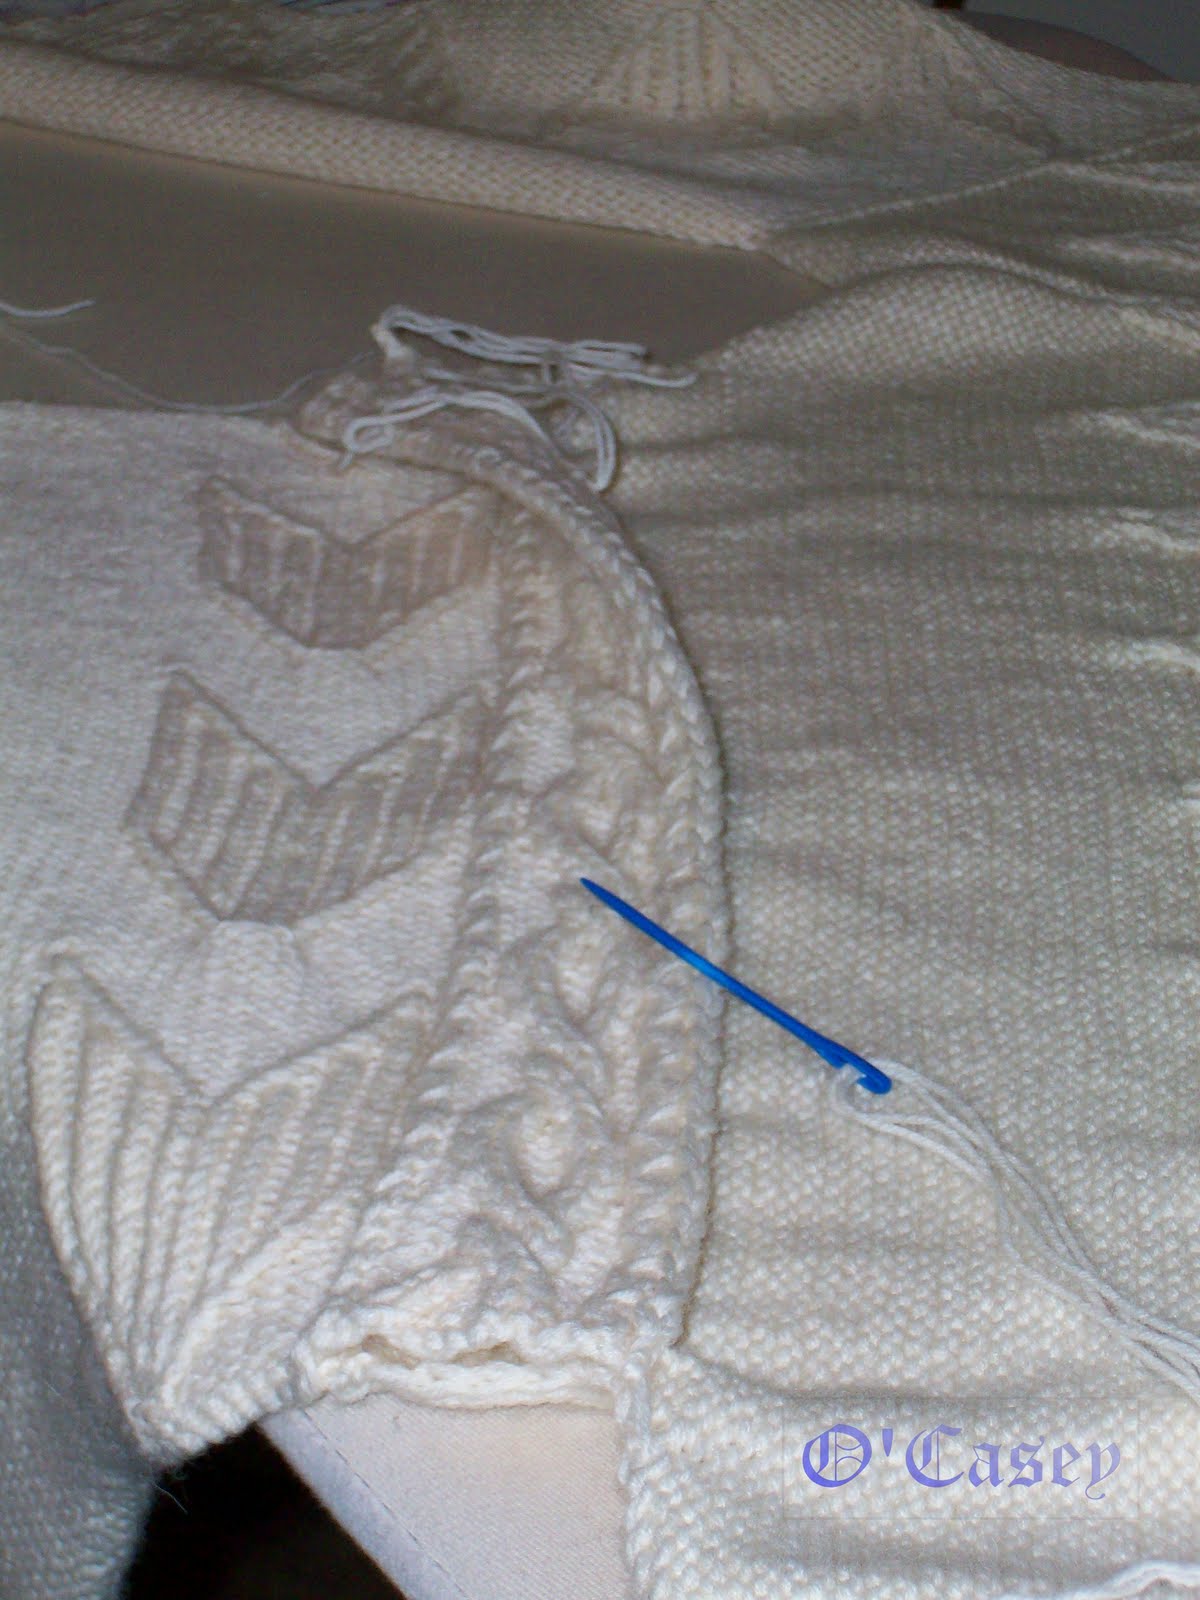
1 darning needle – for pretty casting off to get the edges should be nice and stretchy.

Size M.

Note about selvage stitches (ss): Always slip the first stitch in the beginning of each row and purl the last stitch in the end of each row. In such a way you will have a chain of selvage stitches, - one vertical loop for each 2 rows - on each side of a knitted piece. They will be used to simplify row count and later when assembling this particular vest, they will play an important role: because I use inside-out seams, they will form the nice rows on the right side of the sweater.

Front Central Panel.

Cast on 38 sts, work with a basic stitch 42 ss (86 rows), then cast off the central 7 stitches and continue to work each part separately 23 ss more, then cast off in the beginning of every other row 3, 2, 2, 1, 1, 1, 1, and 0 stitches to shape the neckline.

Back central panel. Cast on 38 sts and work evenly 44 ss (88 rows). Cast off all the stitches in the same row.

When finished, spread them and lightly iron wrong sides of both panels through a wet cotton cloth, without pressing. Let them rest until totally dry. Sew them together by the neckline.

Left side panel.

Lilac-yellow corded trim: With lilac yarn (8 strands together) and smaller needles pick up 150 stitches on the left side of the long central panel and work 3 more rows with simple stockinet stitch (knit on the right side and purl on the wrong), then make 3 rows with yellow yarn (8 strands together). Turn the piece to the wrong side and switch to multi-colored yarn. *Insert right needle into the base of the stitch on the first lilac row, corresponding with the first stitch on the left needle, lift this stitch to the left needle and purl it together with the stitch on the needle*. Continue from * to * until all the stitches from the left needle are purled together with corresponding stitches of the first lilac row.

Ribbing inlay. Continue with larger needles. In the next row add evenly 10 stitches and work 6 more rows with 1x1 ribbing with twisted stitches.

Lilac-blue corded trim: continue with lilac yarn (8 strands together) and smaller needles with simple stockinet stitch. In the first lilac row reduce the number of stitches by 10, make 3 more lilac rows (4 total), then make 3 rows with blue yarn (8 strands together). Turn the piece to the wrong side and switch to multi-colored yarn. *Insert right needle into the base of the stitch on the first lilac row, corresponding with the first stitch on the left needle, lift this stitch to the left needle and purl it together with the stitch on the needle*. Continue from * to * until all the stitches from the left needle are purled together with corresponding stitches of the first lilac row. At the same time cast off the last 36 sts in this wrong side row – the bottom panel will be attached here.

Now we have 114 stitches (150-36). We will use the wrong side of our basic stitch for the rest of the side panels. Work straight 8 rows. Mark the middle of the work – between 57 and 58 sts with a pin or colorful thread. Cast off the middle 14+14=28 sts, and work the row to the end. Turn, work the row to the end. Decrease in the beginning of the next and every other row 7 sts – 2 times, 5 sts – 1 time, 3 sts – 1 time, 1 st – 6 times, 0 sts 3 times and bind off. In the same way finish the opposite side of the piece.

In the same way, make the right side panel.

When finished, spread the side panels and lightly iron wrong sides of the basic stitch (not ribbing or cords!) through a wet cotton cloth, without pressing. Let them rest until totally dry and finish the little side seams using mattress seam.

Lilac-green corded trim: Cast on with lilac yarn and smaller needles 140 sts on the bottom of the piece and work 3 more rows with simple stockinet stitch, then make 3 rows with green yarn (8 strands together). Turn the piece to the wrong side. *Insert right needle into the base of the stitch on the first lilac row, corresponding with the first stitch on the left needle, lift this stitch to the left needle and purl it together with the stitch on the needle. Cast the stitch off (starting with the 2nd stitch)*. Continue from * to * until all the stitches from the left needle are purled together with corresponding stitches of the first lilac row and casted off.


Bottom panel. Cast on 84 sts and work 85 ss (170 rows) with simple reverse stockinet, performing the following stitch pattern:


c2f: Slip next stitch onto cable needle, hold at front of work. Knit 1, knit the stitch on the cable needle.

t2f: Slip next stitch onto cable needle, hold at front of work. Purl 1, knit the stitch on the cable needle.

t2b: Slip next stitch onto cable needle, hold at back of work. Knit the next stitch, purl the stitch on the cable needle.

c2b: Slip next stitch onto cable needle, hold at back of work. Knit the next stitch, knit the stitch from the cable needle.

c4f: Slip next 2 stitches onto cable needle, hold at front of work. Knit 2, knit the stitches on the cable needle.

Row 1 (Right Side): p3, c4f, p2, k1, p4, c2f, p4, k1, p2.

Row 2 (Wrong Side): k2, p1, k4, p2, k4, p1, k2, p4, k3.

Row 3: p3, k4, p2, [t2f, p2, t2b] 2 times, p2.

Row 4: k3, [p1, k2] 3 times, p1, k3, p4, k3.

Row 5: p3, c4f, p3, t2f, t2b, p2, t2f, t2b, p3.

Row 6: k4, [p2, k4] 2 times, p4, k3.

Row 7: p3, k4, [p4, c2b] 2 times, p4.

Row 8: k4, [p2, k4] 2 times, p4, k3.

Row 9: p3, c4f, p3, t2b, t2f, p2, t2b, t2f, p3.

Row 10: k3, [p1, k2] 3 times, p1, k3, p4, k3.

Row 11: p3, k4, p2, [t2b, p2, t2f] 2 times, p2.

Row 12: k2, p1, k4, p2, k4, p1, k2, p4, k3.

When finished, spread and lightly press, like all the other details. When totally dry, attach it to the body of the sweater using mattress seam.

Ribbing on the bottom of the sweater can be done with circular needles as one piece but I preferred to do it as 2 pieces with invisible side seams. First half: cast 90 sts on the front, work 14 rows, cut the yarn you have been knitting with, making sure it is at least 3 times as long as the work you want to finish, and cast off all the stitches with a darning needle (for very stretchy and pretty finishing):

Run the darning needle from right to left through the edge stitch, and if the next one is a knit stitch through this one too, if a purl stitch – through this one and the next one too (we need the first stitch on the left needle to be purl); let these stitches slip from the needle and pull the yarn firmly.

 1. Pull the thread from left to right through the first purl stitch on the needle and pull firmly. Leave the stitch on the left needle.


2. From right to left through the middle of previous knit stitch (it is no longer on the needle) and at the same time run the darning needle through the second stitch on the needle (also a knit stitch) and pull firmly. Leave the stitches still on the left needle.


 3. Run the thread from right to left through the first purl stitch, pull firmly and slip 2 stitches (one purl and one knit) from the needle.


Cast on 90 sts on the back, work 14 rows, cast off with a needle and finish side seams.

Ribbing on the armholes:

Lilac-red corded trim: with small needles and lilac yarn cast on 100-104 sts around the armhole and work 3 more rows, switch to red yarn and work 3 rows, then switch to multi-colored yarn, Turn the piece to the wrong side and switch to multi-colored yarn. *Insert right needle into the base of the stitch on the first lilac row, corresponding with the first stitch on the left needle, lift this stitch to the left needle and purl it together with the stitch on the needle*. Continue from * to * until all the stitches from the left needle are purled together with corresponding stitches of the first lilac row.

Using larger needles work 8 rows. Cast off with a needle. Repeat on the other armhole, finish the short under-arm seams.

Collar. Cast on 92 sts on the neck line (24 sts on the first half of the front, 44 on the back, and 24 on the second half of the front) and work straight 16 ss (32 rows) the ribbing with twisted stitches, cast off with a needle.

For the righ buttonband cast on on the edge of the collar and the middle of the sweater 49-50 sts, work straight 8 rows and finish with a needle.
For the left butonband cast on the same number of sts as for the right one and work 3 rows. In the 4-th row make buttonhole (evenly spaced double yo (wrapping the yarn over right –hand needle)). So, starting with the edge of the collar, the double yo (yarn over needle) will be done after 4th, 16th, 28th, and 40th sts. In the next row unwind one of the yos and knit it together with the nearest knit stitch. After the 8-th row cast off all the stitches with a needle and assemble the middle point. Sew the buttons on.

I always try a sweater on right before giving it away....


.... and make lots of pictures.


Sunday, September 5, 2010

UKRAINIAN SONG


My first (but not the last!) experiment with ethnic style. I was not sure about anything when I was making it… I was not even sure I would show it. But Kostik, my nephew, is wearing the vest with such ease like he had been born with it. Actually it was the biggest surprise to me that this thing can look so nice and casual in real life, on the street. As always, I made lots of shots, and then I had the hardest time to pick the best – I liked all of them. Kostik is a historian and a teacher – not a model at all, but he was so graceful and self composed and so much himself as if it were the most obvious thing for him – being constantly photographed on the street and in the city park for more than an hour – with lots of curious people around.

Before making this vest I looked through several encyclopedias and Ukrainian embroidery resources – just for the insight, I didn’t want to mimic anything. Of course, the main source of insight was Kostik himself.


The front of the vest is made with angle knitting (just like famous “Baby Surprise Jacket” by Elizabeth Zimmermann. BTW, Kostik was so cute as a baby! :-)). The back is composed of 2 details – the yoke with patterned band and arrow stitch and the body. They overlap (upper part of the body goes under the horizontal patterned yoke band). The body or the back is eased in a little bit.

The vest is trimmed with patterned light brown band which is made separately, and finished with white cable reverse stockinet border.Size M-L.

Materials:

14 balls of “Sock It to Me 4 Ply” yarn, each ball 50g (1.75 oz) 229 yards (209 meters) - Cream color and almost 6 balls of the same yarn – Latte color (light brown). Double strand knitting.
Needles: number 6 or to obtain gauge – 18 sts in 4” (10 cm).
Note about selvage stitches (ss): Always slip the first stitch in the beginning of each row and purl the last stitch in the end of each row. In such a way you will have a chain of selvage stitches, - one vertical loop for each 2 rows - on each side of a knitted piece. I usually don’t count rows, I count selvage stitches. Another advantage – they look very nice when assembled by mattress stitch.

The most part of the vest is done with reverse stockinet.

Stitch patterns:

Pattern 1 (Trident) 28 stitches x 24 rows


Stitch Key
Stockinet Stitch: Knit 1 (k) on right side rows, purl 1 (p) on wrong side rows.
Reverse Stockinet Stitch: Purl 1 on right side rows, knit 1 on wrong side rows.
t2b: Slip next stitch onto cable needle, hold at back of work. Knit the next stitch, purl the stitch on the cable needle.
t2f: Slip next stitch onto cable needle, hold at front of work. Purl 1, knit the stitch on the cable needle.
c2b: Slip next stitch onto cable needle, hold at back of work. Knit the next stitch, knit the stitch from the cable needle.
c2f: Slip next stitch onto cable needle, hold at front of work. Knit 1, knit the stitch on the cable needle.

Row 1 (Right Side): p5, c2b, c2f, p10, c2b, c2f, p5.
Row 2 (Wrong Side): k5, p4, k10, p4, k5.
Row 3: p4, t2b, k2, t2f, p8, t2b, k2, t2f, p4.
Row 4: k4, p1, k1, p2, k1, p1, k8, p1, k1, p2, k1, p1, k4.
Row 5: p3, c2b, p1, k2, p1, c2f, p6, c2b, p1, k2, p1, c2f, p3.
Row 6: k3, [p2, k1] 2 times, p2, k6, [p2, k1] 2 times, p2, k3.
Row 7: p2, t2b, k1, p1, k2, p1, k1, t2f, p4, t2b, k1, p1, k2, p1, k1, t2f, p2.
Row 8: k2, [p1, k1] 2 times, p2, [k1, p1] 2 times, k4, [p1, k1] 2 times, p2, [k1, p1] 2 times, k2.
Row 9: p1, c2b, p1, k1, p1, k2, p1, k1, p1, c2f, p2, c2b, p1, k1, p1, k2, p1, k1, p1, c2f, p1.
Row 10: k1, [p2, k1, p1, k1] 2 times, p2, k2, [p2, k1, p1, k1] 2 times, p2, k1.
Row 11: t2b, [k1, p1] 2 times, k2, [p1, k1] 2 times, t2f, t2b, [k1, p1] 2 times, k2, [p1, k1] 2 times, t2f.
Row 12: p1, [k1, p1] 2 times, k1, [p2, k1, p1, k1, p1, k1] 3 times, p1.
Row 13: k1, [p1, k1] 2 times, t2b, t2f, [k1, p1] 2 times, k2, [p1, k1] 2 times, t2b, t2f, [k1, p1] 2 times, k1.
Row 14: p1, k1, p1, k1, p2, k2, [p2, k1, p1, k1] 2 times, p2, k2, p2, [k1, p1] 2 times.
Row 15: k1, p1, k1, p1, t2b, p2, t2f, p1, k1, p1, k2, p1, k1, p1, t2b, p2, t2f, [p1, k1] 2 times.
Row 16: p1, [k1, p1] 2 times, k4, [p1, k1] 2 times, p2, [k1, p1] 2 times, k4, [p1, k1] 2 times, p1.
Row 17: k1, p1, k1, t2b, p4, t2f, k1, p1, k2, p1, k1, t2b, p4, t2f, k1, p1, k1.
Row 18: p1, k1, p2, k6, [p2, k1] 2 times, p2, k6, p2, k1, p1.
Row 19: k1, p1, t2b, p6, t2f, p1, k2, p1, t2b, p6, t2f, p1, k1.
Row 20: p1, k1, p1, k8, p1, k1, p2, k1, p1, k8, p1, k1, p1.
Row 21: k1, t2b, p8, t2f, k2, t2b, p8, t2f, k1.
Row 22: p2, k10, p4, k10, p2.
Row 23: t2b, p10, t2f, t2b, p10, t2f.
Row 24: p1, k12, p2, k12, p1.

Pattern 2 (Arrow) - 14 stitches x 32 rows


Stitch Key
Stockinet Stitch: Knit 1 (k) on right side rows, purl 1 (p) on wrong side rows.
Reverse Stockinet Stitch: Purl 1 on right side rows, knit 1 on wrong side rows.
c2b: Slip next stitch onto cable needle, hold at back of work. Knit the next stitch, knit the stitch from the cable needle.
c2f: Slip next stitch onto cable needle, hold at front of work. Knit 1, knit the stitch on the cable needle.
t2b: Slip next stitch onto cable needle, hold at back of work. Knit the next stitch, purl the stitch on the cable needle.
t2f: Slip next stitch onto cable needle, hold at front of work. Purl 1, knit the stitch on the cable needle.

Row 1 (Right Side): p5, c2b, c2f, p5.
Row 2 (Wrong Side): k5, p4, k5.
Row 3: p4, t2b, k2, t2f, p4.
Row 4: k4, p1, k1, p2, k1, p1, k4.
Row 5: p3, c2b, p1, k2, p1, c2f, p3.
Row 6: k3, [p2, k1] 2 times, p2, k3.
Row 7: p2, t2b, k1, p1, k2, p1, k1, t2f, p2.
Row 8: k2, [p1, k1] 2 times, p2, [k1, p1] 2 times, k2.
Row 9: p1, c2b, p1, k1, p1, k2, p1, k1, p1, c2f, p1.
Row 10: k1, [p2, k1, p1, k1] 2 times, p2, k1.
Row 11: t2b, [k1, p1] 2 times, k2, [p1, k1] 2 times, t2f.
Row 12: p1, [k1, p1] 2 times, k1, p2, [k1, p1] 3 times.
Row 13: k1, [p1, k1] 2 times, p1, k2, [p1, k1] 3 times.
Row 14: p1, [k1, p1] 2 times, k1, p2, [k1, p1] 3 times.
Row 15: k1, [p1, k1] 2 times, p1, k2, [p1, k1] 3 times.
Row 16: p1, [k1, p1] 2 times, k1, p2, [k1, p1] 3 times.
Row 17: k1, [p1, k1] 2 times, p1, k2, [p1, k1] 3 times.
Row 18: p1, [k1, p1] 2 times, k1, p2, [k1, p1] 3 times.
Row 19: k1, [p1, k1] 2 times, t2b, t2f, [k1, p1] 2 times, k1.
Row 20: p1, k1, p1, k1, p2, k2, p2, [k1, p1] 2 times.
Row 21: k1, p1, k1, p1, t2b, p2, t2f, [p1, k1] 2 times.
Row 22: p1, [k1, p1] 2 times, k4, [p1, k1] 2 times, p1.
Row 23: k1, p1, k1, t2b, p4, t2f, k1, p1, k1.
Row 24: p1, k1, p2, k6, p2, k1, p1.
Row 25: k1, p1, t2b, p6, t2f, p1, k1.
Row 26: p1, k1, p1, k8, p1, k1, p1.
Row 27: k1, t2b, p8, t2f, k1.
Row 28: p2, k10, p2.
Row 29: t2b, p10, t2f.
Row 30: p1, k12, p1.
Row 31: p14.
Row 32: k14.

Pattern 3 - 16 stitches x 16 rows


Stitch Key
k: Knit 1.
p: Purl 1.
c2b: Slip next stitch onto cable needle, hold at back of work. Knit the next stitch, knit the stitch from the cable needle.
c2f: Slip next stitch onto cable needle, hold at front of work. Knit 1, knit the stitch on the cable needle.
t3b: Slip next stitch to cable needle, hold at back of work. Knit 2, purl the stitch on the cable needle.
t3f: Slip next 2 stitches onto cable needle, hold at front of work. Purl 1, knit the stitches on the cable needle.
c4f: Slip next 2 stitches onto cable needle, hold at front of work. Knit 2, knit the stitches on the cable needle.

Row 1 (Right Side): c2b, p3, c4f, p3, c2b, p2.
Row 2 (Wrong Side): k2, p2, k3, p4, k3, p2.
Row 3: c2f, p3, k4, p3, c2f, p2.
Row 4: k2, p2, k3, p4, k3, p2.
Row 5: c2b, p3, c4f, p3, c2b, p2.
Row 6: k2, p2, k3, p4, k3, p2.
Row 7: c2f, p2, t3b, t3f, p2, c2f, p2.
Row 8: k2, [p2, k2] 3 times, p2.
Row 9: c2b, p1, t3b, p2, t3f, p1, c2b, p2.
Row 10: k2, p2, k1, p2, k4, p2, k1, p2.
Row 11: c2f, p1, k2, p4, k2, p1, c2f, p2.
Row 12: k2, p2, k1, p2, k4, p2, k1, p2.
Row 13: c2b, p1, t3f, p2, t3b, p1, c2b, p2.
Row 14: k2, [p2, k2] 3 times, p2.
Row 15: c2f, p2, t3f, t3b, p2, c2f, p2.
Row 16: k2, p2, k3, p4, k3, p2.

LEFT FRONT

Cast on 127 sts (46 sts – horizontal side, 1 central stitch (mark it with colorful yarn, on both sides of this stitch we will decrease stitches, that will create the angle), and 80 sts of vertical side).


1st row (wrong side, we start with vertical side): 1k, 79 k., 1 p. (central st), 45 k., 1 ss.
2nd row (right side): 1 ss, 43 p., 2 p. together, I k. (central stitch), p. together, 77 p., ss
3rd row: like 1st row but on both sides of the center stitch knit 2 sts together,
4th row: on the both sides of the central st don’t decrease sts. And continue in this way, don’t decrease sts by the central st in every 3rd row to the very end of the piece. This is also the first row of the Trident (pattern 1). Don’t forget that the pattern starts with 5 purls.
5th row: as established and according to the pattern.
Beginning with 6th row, we start to shape the neckline. In the next 36 rows we should add 27 sts in the end of s following: 12 times – 1 st, 4 times – 2 sts, 1 time – 3 sts, and 1 time, all in the end of each right side row. Then work 7 rows straight and bind off.

Make the right half symmetrical to the left one.

BACK


Cast on 119 sts: 1ss, 1 p., 28 sts of pattern 1, 1p., 28 sts of pattern 1, 1p. 28 sts of pattern 1, 1 p., 28 sts of pattern 1, 1p., 1 ss. Work 48 rows.
Bind off in the beginning of every row 5 sts 2 times, 3 sts 2 times, 2 st 2 times, and then 1 st 6 times. Bind all the stitches off .


Yoke


Cast on 78 sts: 1 ss, 1p., 14 sts of pattern 3, 2 p., 14 sts of pattern 2 (start the arrow not immediately but in the row 3), 46 sts of reverse stockinette. Work straight 6 rows.
Then in the beginning of each wrong row bind off 2 sts 1 time, 1 st. 21 times, and work 6 rows straight (56 rows total). This is half of the yoke. Then work straight 6 more rows, increase in the beginning of each wrong row 1 st. 21 times and 2 sts 1 time.
Work straight 6 rows and bind off.

ASSEMBLY 1


Assemble the back with 2 seams overlapping the yoke over the back and easing off the back at the same time (see picture). Make shoulder and side seams.

BROWN TRIM


Brown trim consists of 6 separate pieces:
– Long straight horizontal bottom piece (19)
– 2 straight front vertical pieces (7 full big “O”s)
– 1 rounded piece around the neck (10 full big “O”s)
– 2 straight armhole pieces (10 full big “O”s).

For the bottom piece cast on 2 sts and work pattern 3 adding at the same time 16 sts during 28 rows from one side and immediately incorporating them into the pattern. Follow the pattern but omit the row with the twist. When all the sts are added on, make the first twist, and then continue straight following the pattern without omissions. The piece should contain 19 full big “O”s and 2 open ones in the beginning and in the end (see photo). In the end of a piece decrease the sts absolutely the same way as you added them in the beginning (16 sts during 28 rows). The stitches should be decreased at the same side of the stripe as the increasing.
Start the same way the front piece, work 7 full “O”s, but decrease the stitches faster: 16 sts during 16 rows (1 st per row), this end will be attached to the neck trim. The stitches should be decreased at the same side of the stripe as the increasing.

Make another front trim symmetrical (not identical!) to the first one.


For the rounded neck trim cast on 2 sts and add 16 sts from one side during 16 rows (so that this strip matches the front one). Work 10 big “O”s and decrease the stitches in the same way, in every row from one side, the stripe should be symmetrical. What makes it rounded are the short rows. 5 groups of 4 short rows are supposed to be made between 1 and 2, 3 and 4, 5 and 6, 7 and 8, 9 and 10 big “O”s.
To make a short row, *work the row not to the very end but only 14 sts. Slide the next st to the right needle, bring yarn to front between needles, slide stitch back to the left needle, and turn the work, work to the end of the row”. 3 more times repeat * *. The side of the piece where the wrapped stitch is located will be shorter than the opposite one, this is what makes the piece to form a curve.
Armhole piece: cast on 18 sts and work 15 rows following pattern 3 without twists. Then make a twist, 10 big “O”s, and finish with 15 rows without twist. Bind off.
Attach all the light-brown trim to the vest. Overlap them on the arm holes as shown on the pictures.


WHITE CABLE BORDER

All the vest is trimmed with one long cable border. 2 separate pieces are made for the arm holes.
Cast on 16 sts: 1 selvage stitch, 5 sts knitted for garter stitch (all k) and 10 purl sts for the reverse stockinet cable (always knit the edge st of the cable, both on the right and of the wrong side).
In each 13th row make a twist: slip next 5 stitches onto cable needle, hold at front of work. Knit 5, knit the stitches on the cable needle.
All the white cable border is made with a single piece the beginning of which will be attached close to the left side seam, in the bottom. To turn the corners of the vest, the short rows will be used again. Each corner will be attached to a twist. So, just before and after a corner twist a group of 3 short rows will be made: in the wrong side row just preceding the twist and on the wrong side row just after the twist.
So, start the border, make the first twist not on the 13th, but at 7th row. Continue to work the piece, 7 more twists. Twist number 9 will be attached to the corner, so make groups of short rows just before and after the twist.
Make 13 more twists, and treat the next one with the groups of short rows – this is the corner by the neck.
Make 13 more twists, and treat with the short rows another corner of the neckline.
Make 13 more twists and treat the next one with short rows.
Make 22 more twists, work about 6 rows and bind off.
Cable border for the sleeves: Cast on 16 sts, work 10 rows, make a twist, continue to work 14 nore twists, work 10 rows, and bind off. Attach to the armhole overlapping as shown on the pictures.
Attach the border cable to the vest. First baste the corners, then attach the band with a mattress seam, andswe together the short sides of the band.


Attach 4 toggle buttons at the twist spots. There is no need for special holes on the opposite side, the cable twists form the holes that can be used to button the vest.